Showing posts with label How-To. Show all posts
Showing posts with label How-To. Show all posts
Sunday, February 22
Monday, September 23
how to screen print
Well here we go - how to screen print.
My fantastic mom made serviettes with Laura's artwork for our wedding. here's how we did it.
1) send a black and white image to Eileen www.eileensstudio.com
eileenneil@shaw.ca
250.752.8684
with a cheque for 5 bucks (for this small size screen)

2) Mix paint and apply to screen

3) draw ink across screen (use a credit card or geometry triangle, or ...)

4) remove screen, iron, and enjoy

And the table setting!

mom and dad in background
heading up the decorations
Saturday, May 25
how to farm worms
Small scale compost can be really dreamy.


my parents had bought this funny, what i thought gimmicky, composter that rolls in a stand.

The ease of turning the compost over increases the air flow and with a balance of nitrogen (kitchen scraps) and carbon (leaves, paper, coconut husk, etc..) this was supposed to be a quick turn around from scraps to soil.
finished compost is harvested out of the inner core of the barrel accessed through a cap visible on the end of the drum.

as it turned out, I threw in a handful of worms from the garden
and Voila! fragrant, beautiful, soil. and about 100 000 000 worms in about 67 days.
this was a couple of years ago and the composter continues to go strong. this is in temperate vancouver island and does not go below freezing year round.
this was a couple of years ago and the composter continues to go strong. this is in temperate vancouver island and does not go below freezing year round.
very fantastic, very fun,
it is very possible that this little system, or a system like it, could produce casting and worms for many gardens.
Thursday, March 8
how to make yogurt without a thermometer
making yogurt is a good thing to do when you're already in the kitchen working on other projects. Last night I was making cookies and dinner, so I put milk on to warm up to the point where my (clean) finger can't stay submerged. There's probably a temperature number you can get from another resource, but it needs to be hotter than you can handle, and the surface tension changes, with minute bubbles appearing.

Take it off the heat then!!
NO boiling, NO scalding..

from the pot (right) pour into cooling container (center) until milk cools to warm ie. comfy to the touch but still hot. Then mix 2 cups milk with either 1) one package yogurt starter (far left) OR 2) a couple of spoons of your last batch of yogurt that was super tasty.

incubate in an insulated container. I found the one pictured in a salvation army thrift store en route tree planting through northern alberta. Made in the 70's, first used in 2011! The 2cups of milk/starter (right) is frothy from being stirred a number of times as it sits (5 minutes) before adding the rest of the hot milk. then the insulated lid (left) fits on top of the insulated bottom to keep the milk/yogurt essentially at/near temperature for 12-24 hours. You don't need to purchase a fancy styrofoam contraption like this one, a good blanket packed tight around a pot might do the trick, who knows?
just remember, heat escapes through the top and the bottom.
happy fermenting

Take it off the heat then!!
NO boiling, NO scalding..
from the pot (right) pour into cooling container (center) until milk cools to warm ie. comfy to the touch but still hot. Then mix 2 cups milk with either 1) one package yogurt starter (far left) OR 2) a couple of spoons of your last batch of yogurt that was super tasty.

incubate in an insulated container. I found the one pictured in a salvation army thrift store en route tree planting through northern alberta. Made in the 70's, first used in 2011! The 2cups of milk/starter (right) is frothy from being stirred a number of times as it sits (5 minutes) before adding the rest of the hot milk. then the insulated lid (left) fits on top of the insulated bottom to keep the milk/yogurt essentially at/near temperature for 12-24 hours. You don't need to purchase a fancy styrofoam contraption like this one, a good blanket packed tight around a pot might do the trick, who knows?
just remember, heat escapes through the top and the bottom.
happy fermenting
Monday, November 21
Scott Harris, a tasteful mason

talk to Scott Harris if you want to build a dry stack wall, or carve beauty into stone.
He lives in lovely New Brunswick |
Saturday, November 19
processing grain by hand
here's the micro-micro grain processing procedure after planting 1/3 of a cup of purple barley this spring.


so rub the full seed heads between hands


and here you are, purple barley! now winnow it on a windy day, or with a fan. simply pour grain and chaff from a bucket into a bucket. the grain (heavier) will fall faster, the (lighter) chaff will blow off into the universe.
don't forget to look up and wonder how the sun is so giving
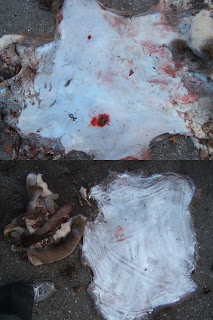
proper hide storage
So if you're interested in storing a hide for the spring weather to warm before tanning your hide, I suggest skinning the animal properly first. ie. it should not look like this.


So in reference to 'proper skinning'.
If you plan on using the hide to make fabric, think about your cuts that will maximize usable sections of fabric. below is an example of a bunch of wasted extraneous hide that I removed due to this.
*note about skinning
When skinning an animal, cut the edges (ie. back of hind, belly, chest, neck and then PUT DOWN YOUR KNIFE AND PULL OFF THE HIDE WITH YOUR HANDS leaving all muscle on the animal so that you eat it! Knifing a hide off is a waste of everybody's time. however coyote appreciates a hide to chew on now and then.

Below (white) is the hide. We want to get muscle/fat off so that it is a nice smooth white colour before we salt it.

If you plan on using the hide to make fabric, think about your cuts that will maximize usable sections of fabric. below is an example of a bunch of wasted extraneous hide that I removed due to this.
*note about skinning
When skinning an animal, cut the edges (ie. back of hind, belly, chest, neck and then PUT DOWN YOUR KNIFE AND PULL OFF THE HIDE WITH YOUR HANDS leaving all muscle on the animal so that you eat it! Knifing a hide off is a waste of everybody's time. however coyote appreciates a hide to chew on now and then.
 |
| click any picture for larger view |
Notice the heavy salting. salt is cheap. use it liberally.
Allow the salt to draw moisture from the hide for 12 - 24 hours. keep the hide on a slight incline to facilitate drain/run off. Once this is done apply more salt if you like, fold the edges in and roll. store in plastic bag, rubbermaid etc. the idea is that the salt binds all the moisture so rot can't set in. We also don't want the hide to dry out. bad news.
this will store long term, as far as I know, as long as animals don't get in...
I prefer to process a hide into rawhide that I then dry and store inside. it becomes smaller, more portable and much more stable (animals aside)
Friday, November 18
how to 'make' horse radish
Harvest the root after a couple of frosts.
carefully dig beside the root to maximize the amount of supple root that is deeper down. Very similar to harvesting burdock (i imagine)
I've learned that even the thin lateral roots clean up really easily, are super texture, and are significant volume.
Clean, chop, process.
Note, be extremely careful if blending, as the root can gasify. I have friends who literally lost their vision when processing inside their house after opening the blender. behave accordingly.
now you can mix with vinegar
OR
a honey water mix that will ferment and acidify on your counter over about 4 weeks. stir occassionally. this is often referred to as a ferment, or wild-ferment. refer to Sandor Katz for fermenting ideas/knowledge, especially a book entitled wild-fermentation.
both are delicious in my opinion.
carefully dig beside the root to maximize the amount of supple root that is deeper down. Very similar to harvesting burdock (i imagine)
I've learned that even the thin lateral roots clean up really easily, are super texture, and are significant volume.
 |
| click for larger view |
Clean, chop, process.
Note, be extremely careful if blending, as the root can gasify. I have friends who literally lost their vision when processing inside their house after opening the blender. behave accordingly.
now you can mix with vinegar
OR
a honey water mix that will ferment and acidify on your counter over about 4 weeks. stir occassionally. this is often referred to as a ferment, or wild-ferment. refer to Sandor Katz for fermenting ideas/knowledge, especially a book entitled wild-fermentation.
both are delicious in my opinion.
Monday, September 5
Tan your own Sheep Hide without Chemicals
Here's How.
Peel the hide off of the animal using your hands. That's right, put your knife down after making your initial cuts along the length of the hind legs and pull. Cutting a thin hide off an animal is prone to cause tears later on in the tanning process.
I use an dull curved knife to clean any remaining fat/muscle from the hide.
Over the period of 3 days I rub a soap/oil (a little water) into the hide. Brains work best. This can all be done stretched in a frame (or not) allowing it to dry into the hide. Then, using a pumice stone I found in the bush, I work the hide on a sunny day, keeping the fibres moving while it dries. I focus on the edges first, and then the main body.
Dissimilar to a deer (etc.) hide, a more agressive tool tends to rip right through the hide. experiment! see what works for you, I suggest being firm, but not aggressive.

for natural tanning how to and know how check out braintan.com and look for Matt's book and the online tanning forum.
Peel the hide off of the animal using your hands. That's right, put your knife down after making your initial cuts along the length of the hind legs and pull. Cutting a thin hide off an animal is prone to cause tears later on in the tanning process.
I use an dull curved knife to clean any remaining fat/muscle from the hide.
Over the period of 3 days I rub a soap/oil (a little water) into the hide. Brains work best. This can all be done stretched in a frame (or not) allowing it to dry into the hide. Then, using a pumice stone I found in the bush, I work the hide on a sunny day, keeping the fibres moving while it dries. I focus on the edges first, and then the main body.
Dissimilar to a deer (etc.) hide, a more agressive tool tends to rip right through the hide. experiment! see what works for you, I suggest being firm, but not aggressive.

Cleaning the Wool side is up to you!
once the hide is dry and soft, fill it with smoke until it takes on colour. this leaves you with a machine washable rug for those cold days and nights that will inevitably come in this beautiful place.
 |
| click for larger version |
for natural tanning how to and know how check out braintan.com and look for Matt's book and the online tanning forum.
Tuesday, August 30
Gundru & salt brine Kale stems
In the season of plenty, lower yourself into your garden accepting the life that, in this case, the wonderful plant we call Kale, gives us.
Now this basket of leaves will crush down for me into a 1L jar to ferment for 3 - 4 weeks before drying.

Now for Gundru, a traditional nepalese ferment. Good friend Miles introduced me to this ferment and writes about it HERE on his GREAT BLOG.
 So with an object (i'm using this water bottle full of water) crush the leaves so they get rich and juicy. this ferment requires ONLY crushed Kale leaves, no water, no salt... On this batch I used this knife to cut the leaves after the crushing stage. Our plan is to ferment and then blend the leaves with seeds etc and dehydrate into crackers.
 Mash those pre mashed leaves into your container, preferably glass or earthen. The bubbly juice is OUTRAGEOUS!
 so here is the beauty. you can see some stems in there (which work just great, you don't need to salt brine them separately, that's just what I did this time.) I cover this with a piece of plastic with a little hole in it or a loose lid. if the lid is tightened on you will need to 'burp it' as the active ferment process of gasses. this will slow down after a week or so in a warm-ish dark place and then it is best to keep the lid on tightly until you are ready to a) eat it b) dry it and eat it. When dried these little devils taste better than the best seaweed you've ever eaten.
 |
| harvest the lowest leaves, allowing the plant to continue growing up from the new leaves in the top middle. |
 |
| here is the set up |

So b/c I think it's a tasty idea, I'm packing jars with stems so tightly that they hold themselves in. Then a little salt, whole garlic (if you like), dill (if you like) whatever, and then some time, will turn these stems into a beautiful, enzyme alive! ferment great for snacks, appetizers, and impressing the inlaws.
 |
| fill em nice and full |


Subscribe to:
Posts (Atom)


